Monday, August 31, 2009

Celebrate One Cupcake at a Time!


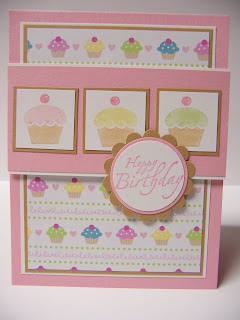
I got this cupcake paper at Archiver's a few months ago and love it paired with the cupcake from the Darling Dots hostess set from the last SU! catalog. I used the same layout I used on this Thoughts and Prayers card, so the birthday card came together really quickly. In fact, I ended up making a few of them to have on hand.

The cupcake paper is layered on Creamy Caramel and then on Whisper White. The cupcakes were colored with Creamy Caramel (cupcake base), Pretty in Pink, Certainly Celery, So Saffron (cupcake tops), and Regal Rose (cherry). The inside sentiment says "celebrate one cupcake at a time" and is from Sweet Little Sentiments, another hostess set from the last SU! catalog.

Thanks for looking!

Supplies:
Stamps: Darling Dots, Sweet Little Sentiments, It's Your Birthday
Cardstock: Whisper White, Pretty in Pink, Creamy Caramel
DSP: Doodlebug
Ink: Pretty in Pink
Markers: Creamy Caramel, Pretty in Pink, Certainly Celery, So Saffron, Regal Rose
Tools: 1 3/8, 1 1/2 and Scallop Circle Punches

Wednesday, August 26, 2009

Baby Congratulations

I recently found out that a friend of mine was expecting, so I made this card to send her my congratulations. I've had this pregnant lady stamp from Michael's forever, but this is the first time it's ever seen ink!

I had a lot of fun with this card. I love the new Melon Mambo in-color! It's the only one I've ordered, but I got the cardstock, ink, DSP and matching ribbon so I'm set with it.

I'm running short on time right now, so I won't go into detail on the card. It should be pretty self-explanatory though. I have a few others I've stamped recently that I'll try to share soon as well.

Thanks for looking!

Supplies:
Stamps: Hugs & Wishes, Michael's $1 stamp
Cardstock: Melon Mambo, Basic Black, Whisper White
DSP: Melon Mambo
Ink: Basic Gray, Basic Black, Melon Mambo
Accessories: Melon Mambo Polka-Dot Grosgrain (I used the back side), Black Gingham, Black Eyelets
Tools: Swiss Dots Embossing Folder, Crop-a-dile, Scallop Edge Punch
Techniques: Paper Piecing

Monday, June 22, 2009

Father's Day Mini-Scrapbook

This mini-scrapbook was a gift for my DH’s first Father’s Day. I used 4x4 chipboard coasters as the backing for the pages and adhered my cardstock to the front and back of each one. I decided to use Perfect Plum, Pale Plum and Basic Grey as my main colors so it wouldn’t be too overly girly, and then I was also able to incorporate some elements from the 2 Sweet Simply Scrappin’ kit.

The stamps are from various Verve Visual sets. I got Verve’s original Father Figure set several weeks ago to make the book, but then I had to have the others when I saw the new ones they recently released. Of course I really liked some of the stamps from each set, so I ended up with them all! And I know I’ll use them over and over for her other scrapbooks as well.


Since I was working with such a small space, I used limited embellishments on each page. I think they are all pretty self-explanatory so I won’t go into a lot of detail. The pictures are from her arrival in the hospital, some time at home with dad, and DH's recent master's graduation.


This is one of my favorite pictures of the two of them. I don't know if you can see it well in the picture or not, but she is holding his finger. I think she was just a little over a week or so old. The quote says "To her the name of father is another name for love." When I saw that quote, I knew I had to have that set!


Supplies Used:
Stamps: Father Figure, Dad’s Day, World’s Best, Protector (all Verve Visual), So Many Sayings (SU!)
Cardstock: Perfect Plum, Pale Plum, Basic Grey, Whisper White
DSP: 2 Sweet Simply Scrappin’ Kit
Ink: Perfect Plum, Pale Plum, Basic Grey
Accessories: Jumbo Eyelets
Tools: Crop-a-dile, Large Star Punch, Star Punch, Scallop Circle Punch, 1 3/8” & 1 ½” Circle Punches, Nestabilities, Chipboard

I hope you had a wonderful day celebrating Father's Day yesterday. We had a Father's Day "fiesta" at our house with DH's side of the family. We are taking our first road trip with our little one this week to see my parents and grandparents and will celebrate with them later in the week. My parents have been up to visit our little one twice, but it will be her first time meeting her great grandparents.

In case you're wondering about the scribbles on the last page - that's our little one's "signature".

Thanks for looking!
Thursday, June 11, 2009

4th Anniversary

Just a quick post with the anniversary card I made for DH. Today was our 4th anniversary. I didn’t have much time during one of my little one’s naps, so I’m glad my idea for the card came together as quickly as it did. I’ve had to buy some cards recently (I know – the horror of actually stopping in the card aisle at the store instead of just passing through), and I was glad to finally be able to make one.

Thanks for looking!

Supplies Used:
Stamps: Anniversary Birds (Verve Visual), Define Your Life, Baroque Motifs
Cardstock: Riding Hood Red, Whisper White, River Rock
Ink: Riding Hood Red, River Rock
Accessories: Riding Hood Red Taffeta, Linen Thread, Basic Grey Button

Our little one turned two months old today, so I’ve included a picture of her from today also. I can't believe it's been 2 months already! She is growing so fast!

Friday, May 15, 2009

It's a girl!

Our little girl was born on April 11th (a few days earlier than we expected). She weighed 7 lbs 7 oz and was 19 1/2 inches long. She arrived via c-section after several hours of labor, but we are both doing great. It's hard to believe she is almost 5 weeks old already. The time is going by so fast! I will not be returning to work and am so thankful that I will be able to stay home with her and watch her grow. And she is definitely growing - she now weighs 9 lbs 6 oz and is 21 1/2 inches.

Sorry for the late update, but thanks for stopping by. I am working on her birth announcements with the limited spare time I have now, so I'm not sure when I'll have something new to post. Hopefully it won't be too long!

Tuesday, April 7, 2009

Baby Boy Brag Book

Only 2 weeks left until my due date! Of course, I wouldn't mind if the little one decided to make an appearance a little early - I'm ready any day! Well, I'm not sure if you're ever really "ready", but you know what I mean.

Anyway, when the baby is born, my mom is coming to stay with us for about a week or so to help out. This won't be the first grandchild for my parents, but it's been quite awhile since the last one was born. Needless to say, they are very excited too. I know my mom will take lots of pictures while she's here, so I thought I'd make a little brag book for her to put a few in. I didn't think I'd be up to it that first week while she's here, so I figured I'd just make a boy one and a girl one, give her the appropriate one, and keep the other for a gift.

I started with the boy book first because I have just loved working with the Delicate Dots DSP that was available through SAB this year. I sometimes have trouble putting various DSP patterns together, but these just seem to go together so easily. If I do have a boy, I'm sure I'll wish I would have gotten more than one package! Anyway, I used the sketch that I used for these cards (here and here) and my beloved Nursery Necessities set.

If you haven't made one before, they are very easy. SCS has a good tutorial to follow. I think the rest is pretty self-explanatory.

Thanks for looking! Stay tuned for the girl version!

Supplies Used:
Stamps: Nursery Necessities
Cardstock: Bashful Blue, So Saffron, Whisper White
DSP: Delicate Dots
Ink: Bashful Blue, So Saffron, Certainly Celery
Accessories: Jumbo Eyelets, Buttons (Wal-Mart)
Tools: Star Punch, 1" Circle Punch (waves under boat), Crop-a-dile

Thursday, April 2, 2009

Thoughts & Prayers Birthday Card

This card uses the same sketch as my previous post (sketch challenge 206 on SCS). For this one, I used the Parisian Breeze Specialty DSP and Thoughts and Prayers again.

I stamped the flower image on a piece of Whisper White and then punched three 1 1/4" circles from the image. I didn't necessarily punch them out right next to each other, but I like how it looks like somewhat of a continuous flow after they were adhered to the card. The sentiment is from Papertrey's Mixed Messages set.

Thanks for looking!

Supplies Used:
Stamps: Thoughts & Prayers, Mixed Messages (Papertrey)
Cardstock: Baja Breeze, Chocolate Chip, Whisper White
DSP: Parisian Breeze Specialty
Accessories: Chocolate Chip Taffeta
Tools: 1 1/4" & 1 3/8" Circle Punches

Monday, March 30, 2009

Jersey Shore Birthday

Even though I used it quite a bit when I first got it, I still have some Jersey Shore DSP left. So - I decided to pull it out for this birthday card. I haven't made anything this bright for awhile, but I like the way it turned out. The cupcakes in the Darling Dots hostess set were perfect for this sketch (Sketch Challenge 206 on SCS).

All 3 of the patterned papers are from Jersey Shore. The polka dot and Brilliant Blue dot patterns are both matted on Brilliant Blue cardstock, and the Pumpkin Pie pattern is matted on Pumpkin Pie cardstock. The cupcakes were punched out with the 1 1/4" circle punch and matted on 1 3/8" circles of Old Olive. Both the Pumpkin Pie layer and cupcake circles are adhered with dimensionals.

The small sentiment tags on the left are from the retired So Many Sayings hostess set. They are tied to the Pumpkin Pie striped ribbon with Linen Thread.

Thanks for looking!

Supplies Used (All Stampin' Up!):
Stamps: Darling Dots, So Many Sayings
Cardstock: Whisper White, Brilliant Blue, Pumpkin Pie, Old Olive
DSP: Jersey Shore
Ink: Pumpkin Pie, Old Olive
Accessories: Pumpkin Pie Striped Ribbon, Linen Thread
Tools: 1 1/4 & 1 3/8" Circle Punches

Sunday, March 22, 2009

Thinking of You

This is the last of the Thoughts & Prayers cards (for now anyway). This one is pretty straightforward. The tree image is matted on 3 strips of Parisian Breeze specialty DSP and then matted on Chocolate Chip cardstock.

The tree was stamped with Baja Breeze ink, and then I went over the trunk and limbs with a Chocolate Chip marker. It would have been easier to do it all with markers, but since we don't have in-color markers, this was my back up plan. Once that was done, I "thumped" my Chocolate Chip marker onto the leaves to give it some additional variation.

Thanks for looking!

Supplies Used (All Stampin' Up!):
Stamps: Thoughts & Prayers
Cardstock: Baja Breeze, Chocolate Chip, Very Vanilla
DSP: Parisian Breeze Specialty DSP
Accessories: Chocolate Chip Taffeta

Friday, March 20, 2009

Wild About Baby Cards

I needed a thank you card, so I decided to use the Sketch for You to Try that I used on this card. I really liked the sketch, and it came together really easily.

The So Saffron background was embossed with the Cuttlebug Swiss Dots Embossing folder, and the striped DSP is from the Delicate Dots DSP package available through Sale-A-Bration. The small buttons are from a variety package I picked up in the sewing section of Wal-Mart.

While I had all of my supplies out, I decided to make a couple of baby cards with the same design. I know a few ladies that are still expecting also, so it will be nice to have them on hand.

Supplies Used:
Stamps: Wild About You, Nursery Necessities, Much Appreciated
Cardstock: Whisper White, So Saffron, Certainly Celery, Pretty in Pink, Bashful Blue
DSP: Delicate Dots, Berry Bliss
Ink: So Saffron, Chocolate Chip, Pretty in Pink, Bashful Blue
Accessories: Buttons (Wal-Mart)
Tools: Cuttlebug Swiss Dots Embossing Folder

Wednesday, March 18, 2009

Praying for You

For this card, I cut a 1 1/8 x 3 3/8 strip of Whisper White and stamped my image before cutting it into 1 1/8" squares. The squares were then matted on 1 1/4" squares of Chocolate Chip.

The sentiment was stamped in Chocolate Chip and then punched with the 1 3/8" circle punch. I wanted to make this a SU! only card, so I resisted the temptation to add a 1 1/2" layer of Baja Breeze before adhering to my scallop circle. (Just as a side note, I think it's interesting that SU! came out with a 1 3/4" circle punch before a 1 1/2". I have a 1 1/2" circle punch from my pre-SU! days and find that I use it quite a bit for layering when sentiments or images don't quite fit on the 1 1/4" and really need the 1 3/8". Anyway, just my thought for the day.)

Thanks for looking!

Supplies Used (All Stampin' Up!):
Stamps: Thoughts & Prayers
Cardstock: Whisper White, Baja Breeze, Chocolate Chip
DSP: Parisian Breeze Specialty
Ink: Baja Breeze, Chocolate Chip, Chocolate Chip Marker
Tools: 1 3/8" & Scallop Circle Punches

Monday, March 16, 2009

Thoughts & Prayers

The next few cards I have to share also use the Thoughts and Prayers set. This one uses Jen del Muro's Sketch for you to Try from last week. I took some inspiration from a couple of different cards that also used her sketch - this one and this one.

This card also uses the Parisian Breeze Specialty DSP, Whisper White, Chocolate Chip and Baja Breeze. I love that color combo!

Thanks for looking!

Supplies Used (All Stampin' Up!):
Stamps: Thoughts & Prayers
Cardstock: Whisper White, Chocolate Chip, Baja Breeze
DSP: Parisian Breeze Specialty
Ink: Baja Breeze, Chocolate Chip, Chocolate Chip Marker
Accessories: Vintage Brads

Saturday, March 14, 2009

Bleached Thoughts & Prayers

This is the second card we were supposed to do at my workshop this past week (it ended up being canceled). I have to say that I really love the new Thoughts & Prayers set. I took it on and off my order a few times because I didn't think I really "needed" it, but I'm so glad I went ahead and got it. Great images and sentiments for those difficult cards!

For this card, I used the bleaching technique to stamp the tree on Baja Breeze cardstock. (Just pour a little bleach onto a paper towel in a small container and use that as your stamp pad.) The sentiment was stamped in Chocolate Chip, and the rest is just layers - Whisper White, Chocolate Chip, and Parisian Breeze Specialty DSP. A few scallops with the scallop edge punch, some Chocolate Chip Taffeta, and the card is complete!

If you haven't had a chance to see or feel the new specialty DSP SU! is offering in this catalog, be sure to check it out! It is a cardstock weight paper with just a little bit of texture. I love it!

Supplies Used (All Stampin' Up!):
Stamps: Thoughts & Prayers
Cardstock: Baja Breeze, Chocolate Chip, Whisper White, Kraft
DSP: Parisian Breeze Specialty
Ink: Chocolate Chip
Accessories: Chocolate Chip Taffeta
Tools: Scallop Edge Punch, Household Bleach
Techniques: Bleaching

Thursday, March 12, 2009

Update & "A Good Egg"

It's hard to believe it's been almost 2 months since I've posted anything (seems to be a recurring theme for me), but time sure has flown by. I am just a little over 34 weeks along now and have spent the majority of my spare time the last few months doing things to prepare for our little one's arrival. We have the nursery pretty well done - thanks to DH's great painting skills, have purchased and/or received the necessities (car seat, etc.) and have been attending birthing classes for the last few weeks. I've spent a lot of my time reading and researching - breastfeeding, cloth diapers, natural childbirth, what kind of car seat to get, strollers, etc., etc. I've been amazed at all the options available! (I've gotten some strange looks when I start mentioning cloth diapers, but we decided to go with them for health, environmental and financial reasons, and it's incredible what is available now - let me tell you, these aren't your grandma's diapers and plastic pants! Here's a link to one of the kinds we're planning to use if you're interested in checking them out.) It's been a fun journey so far, and we are getting very excited to meet our little one and finally find out if it's a boy or girl (I have to admit, the suspense is getting to me a little bit!).


Anyway, sorry to ramble about baby things. I do have a card to share. This is a quick card I am doing for a workshop tonight. It uses the "A Good Egg" set and the Delicate Dots DSP from the Sale-A-Bration promotion. I used paper piecing for the chick and egg, but otherwise it's a pretty straightforward card. I have some other cards to share over the next few days as well. It was fun to finally get a little stamping in again!

Thanks for looking!

Supplies Used (All Stampin' Up!):
Stamps: A Good Egg
Cardstock: Certainly Celery, So Saffron, Whisper White
DSP: Delicate Dots
Ink: Basic Grey, Pumpkin Pie Marker
Accessories: Certainly Celery Grosgrain, Linen Thread
Tools: Word Window Punch
Techniques: Paper Piecing

Tuesday, January 20, 2009

Welcome Little One

I know, another Nursery Necessities card. I can't help but have babies on my mind lately, and I think I mentioned that I knew of 4 other ladies who were also expecting. Well - it was actually 5, and 2 of them have had their babies within the last week or so. They were both girls, so I needed another girl card.

This one is pretty straightforward. It's a 5x5" square card, and I think this is probably my favorite layout for square cards. It seems like the one I always go back to anyway. The Pretty in Pink squares were embossed with the Swiss Dots embossing folder, and the Whisper White squares were wheeled with the Nursery Letters jumbo wheel. The squares were then layered on Rose Red and Basic Black.

I wasn't sure if you could see the sparkle in the first picture or not, so here is a close up of the focal image. After I stamped the boat, I embossed the whole circle with Irridescent Ice embossing powder. I like how that gives the card a different look than just embossing the stamped image.

Finally, the "Welcome Little One" tag is popped up on dimensionals and has a mini library clip at the end.

Thanks for looking!

Supplies:
Stamps: Nursery Necessities, Nursery Letters
CS: Whisper White, Rose Red, Pretty in Pink, Basic Black
Ink: Pretty in Pink, Rose Red
Accessories: Mini Library Clip
Other: Irridescent Ice Embossing Powder
Tools: Swiss Dots Embossing Folder, Circle & Scallop Circle Nestibilities

Sunday, January 11, 2009

Baby Announcement

I know I still have a few months to go, but I've been playing around with baby announcements, and I really like this one so far.

It is a tri-fold card with an opening for the baby's picture. My sample was done with So Saffron and Certainly Celery; however, the Celery will be changed to either Pretty in Pink or Bashful Blue after the baby is born. My card base is 5 1/2 by 12, scored at 3 7/8 and 7 3/4. I used one of my rectangle nestibilities to cut out the opening for the picture.

The moon and small star were cut out. The moon was outlined with Dazzling Diamonds, and the small star was embossed with Irridescent Ice EP. The larger star was also embossed with II EP and punched out with the large star punch.

The first opening of the card will show the details for the baby - name, weight, length, etc. I plan to do that on the computer and then adhere it to the right side (currently blank). This side also has a slit punched in the upper right to hold the card closed.

The left side was covered with So Saffron DSP to hide the back of the slit punches (seen in the final picture below). It also has another large star and Welcome Little One punched out with the Word Window punch and adhered with dimensionals.

The final opening of the card will reveal the full baby picture (far left). The photo will be held in place with a slit punch at the top and bottom so it can be removed.

Once I decide if this is "the one", my plan is to get the card bases and moons ready before the baby is born (one of the reasons I chose So Saffron for them). Then I'll just need to fill in the rest with either pink or blue.

Thanks for looking!

Supplies:
Stamps: Nursery Necessities, Nursery Letters Jumbo Wheel
Cardstock: So Saffron, Whisper White
DSP: So Saffron, Certainly Celery
Ink: So Saffron, Certainly Celery
Accessories: Certainly Celery Grosgrain, White Brad
Other: Irridescent Ice EP, Dazzling Diamonds
Tools: Large Star Punch, Word Window Punch, Slit Punch, Crop-a-Dile, Rectangle Nestibilities

Thursday, January 8, 2009

Baby Thank You Cards #2

Here's the second installment of my baby thank you cards. I hope you're not getting tired of Nursery Necessities yet. It's the only thing I've had out on my stamping table lately! Both cards are pretty self-explanatory so I won't go into a lot of detail on either.

This first card uses the Cuttlebug Thank You embossing folder. It's hard to tell in the photo, but I sponged the raised portions of the embossed image with Whisper White craft ink. The white squares down the left side of the card were punched out with the 1 3/8" square punch and matted with 1 1/2" So Saffron squares. The star and bottom of the sailboat are raised up on dimensionals.

For the second card, I ran the square embossing folder through my Big Shot 3 times and then stamped the chick inside each square. I started with the middle square and then just eyeballed the placement of the other 2. The thank you stamp is from the Enjoy Every Moment set.

Supplies:
Stamps: Nursery Necessities, Enjoy Every Moment
Cardstock: So Saffron, Certainly Celery, Whisper White, Basic Black
Ink: So Saffron, Certainly Celery, Basic Black
Accessories: Whisper White Taffeta
Tools: Large Star Punch, 1 3/8" Square Punch, Cuttlebug Thank You & Playful Squares Embossing Folders

Tuesday, January 6, 2009

Baby Thank You Cards #1

We've received a few baby gifts already, so I thought I should probably start making a stash of thank you cards. Here are a couple, and as the title of the post suggests, there will be another installment.

This first one is my favorite. It is cased from this card by Sharon Johnson which I've had in my favorites at SCS for a long time. I kept all of the same elements and just changed the colors for my card. Since we don't know what we've having (and don't plan to find out until the birth day), I decided to go with the standard gender-neutral color combo of green (Certainly Celery) and yellow (So Saffron). I used markers to ink the sailboat and stamped it directly onto the Whisper White CS. The moon was stamped, cut out, and then outlined with Dazzling Diamonds. The small star was embossed with Irridescent Ice EP and then cut out.

For the second card, I stamped the sailboat multiple times across the strip of Whisper White and then just stamped the small sail onto the focal piece. The larger sail and boat bottom were stamped onto Patterns DSP with Versamark, embossed with Clear EP, cut out, and popped up on dimensionals.

Supplies (All Stampin' Up!):
Stamps: Nursery Necessities, Nursery Letters, Much Appreciated
CS: Certainly Celery, Whisper White
DSP: So Saffron & Certainly Celery Patterns DSP
Ink: Certainly Celery, So Saffron, Basic Black, Versamark
Accessories: Certainly Celery Grosgrain, Rhinestone Brads
Other: Dazzling Diamonds, Clear & Irridescent Ice EP
Tools: Large Star Punch

Sunday, January 4, 2009

Nursery Necessities Baby Cards

I just got the Nursery Necessities set, and I've had a lot of fun playing with it so far - such a cute set and really easy to work with! I have a few friends who are also expecting, so I made a couple of cards to have ready. I don't know what any of them are having yet, so hopefully there will be at least one boy and one girl out of the 4!

I made the boy card first and then just changed the colors for the girl card. For each, I inked the smaller sail of the boat with a marker and stamped it directly onto the Whisper White CS and then stamped the boat again in Versamark on the colored CS. The colored CS was embossed with clear EP, cut out, and popped up on dimensionals. The moon and small star were embossed with Irridescent Ice EP and then cut out as well (I had the small star punch on my last order and took it off at the last minute - silly me!). Other than that, I think the rest is pretty self-explanatory.

I also have a potential baby announcement and a few thank you cards with this set that I'll post over the next few days.

Thanks for looking! I hope you're enjoying a Happy New Year so far!

Supplies (All Stampin' Up!):
Stamps: Nursery Necessities, Nursery Letters Jumbo Wheel
CS: Whisper White & Kraft (both), Bashful Blue & Night of Navy (boy), Pretty in Pink & Rose Red (girl)
Ink: Whisper White & Versamark (both), Bashful Blue & Night of Navy (boy), Pretty in Pink & Rose Red (girl)
Accessories: Bashful Blue Taffeta (boy), Whisper White Taffeta (girl), Linen Thread
Tools: Scallop Edge Punch, Small Oval Punch
Other: Clear, Irridescent Ice & White EP