Friday, October 26, 2007

Let Them Eat Cake!

I have a different type of creation to share with you today.... I finished my cake decorating class last night, so I thought I'd share my final cake (well - a picture anyway, DH took the actual cake to school with him. The other teachers love it when he brings in my "homework"!). I took the Wilton 1 class in the spring and had so much fun that I decided to go back for Wilton 2. My mom decorated cakes when I was growing up, so it was always something I wanted to try. I still need practice, but it's been fun to learn!

As a side note - if you are in the market for a great cake recipe, try out this one. It's the recipe I've been using since I started these classes, and I have to say it's the best cake I've had in a long time. I've only tried the white cake version, but I'm sure the others would be great as well. A very moist and dense cake!

Wednesday, October 24, 2007

Basic Pomegranate Color Challenge

The color challenge for this week was to use Basic Gray (or any dark gray or Going Gray), Purely Pomegranate (or Rose Red) and Soft Sky (or Bashful Blue). I don't have Soft Sky, so I went with the alternative Bashful Blue.

Before Sunday, I probably wouldn't have paired Bashful Blue with Purely Pomegranate, but I just used those colors (along with Basic Black and Certainly Celery) on my featured stamper card for this week. I was surprised to be using them together again so soon and had quite a bit of trouble deciding what I wanted to do for this card. I designed a card in my head while I was at work Tuesday. When I started to work on the card late in the evening, it just was not working for me - let's just say the card looked tons better in my head than it did on paper. I had gotten home later than normal and had to bake a cake for my last cake decorating class this week, so I finally gave up on it and went on to other things. I think it might be missing something, but I can't for the life of me figure out what to change. I have to frost my cake tonight though, so it's staying the way it is!

My card base is a 4 1/4 x 11" piece of Basic Grey. To that, I added a 4 x 5 1/4" piece of Bashful Blue. I stamped the swirl from Priceless in the upper right corner in Bashful Blue. After I had assembled the whole card, I added the sentiment, from So Many Sayings, at the bottom in Basic Grey.

My focal image is from a CTMH set called Snow Business. I've had it forever - I think even back from when the company was called DOTS, but I'm not entirely sure. I stamped the snowman in Basic Grey and used a blender pen to color his hat and scarf with Purely Pomegranate. I then cut my cardstock so the image was at a little bit of an angle - just to add a little more interest to the image. I then added some doodling around the snowman, added some Vintage brads in the corners, and layered him on Basic Grey.

The middle strip was stamped with Snowflake Spot in Bashful Blue, 2nd generation Bashful Blue, Purely Pomegranate, and 2nd generation Basic Grey. It was layered on Basic Grey. The ribbon is one of my favorites - Purely Pomegranate double-stitched.

Recipe:
Stamps: Snowflake Spot, Priceless, Snow Business (CTMH)
Cardstock: Bashful Blue, Basic Grey, Whisper White
Ink: Bashful Blue, Basic Grey, Purely Pomegranate
Other: Purely Pomegranate Double-Stitched Ribbon, Vintage Brads

Tuesday, October 23, 2007

Birthday RAKs

I received so many wonderful cards for my birthday last week and just wanted to share them with you.

The first picture is a wonderful gift I received from my DDSS (demo secret sister on SCS). She sent me a great altered box filled with all kinds of fun stuff - a bag of candy corn topped with a cute witch bag topper, some Halloween pens in the spider pencil/pen holder, a purse "nugget" holder made from the scallop punch, a ghost cookie cutter, and a 2-5-7-10 bag filled with ribbon, chipboard pieces, and some other fun Halloween goodies. Thanks so much to my big sis! What a great gift! And perfect timing too - I received it the day before my birthday.

This "Special Delivery" card was the first one I received from my big sis. It wasn't specifically a birthday card, but I wanted to share it as well. Such a fun image and great coloring! I love the little tug boat carrying all of the packages.


This "Make a Wish" card was from Christine, aka photobug. She said she adapted the card from Kristina Werner (starofmay). Love the bright colors on this one! Purely Pomegranate is one of my favorite colors, so it was fun seeing it paired up this way.


I loved the soft colors on this card from Debbie, aka Twinsstamper. Print Pattern was the perfect background to the card. Great 2-step stamping on it too!


This fun buckle card was from shopgirl. She had a little different take on the buckle than others I've seen. Instead of cutting off part of the front, it is a complete card front and the buckle just wraps around to keep it closed. Great idea! I loved the color combo and the resist technique on the butterfly panel too.


Laurel, aka lklinge, sent this pumpkin card. I love the little pumpkin cart, and the color combo is perfect for a fall birthday!


I loved the color combo on this cheerful card from Kathy, aka scrapkathy. In my opinion, you can never go wrong with pink and black together! I also loved how the birthday images are stamped behind the words on the tags.


I received my first birthday card from Nana2ajj - almost a whole week early! This girl was on the ball! I love the spectrum ink on this card and how the trees take a background to that great elephant image. (If you can see the small water spot on the front of this card, please know that it didn't come that way. I was so irritated with myself when I realized I had gotten a little drop on the card front after just opening it.)


And last but not least is this card from Kudzu. The Prints DSP is one of my favorites, and I love the Groovy Guava and Chocolate Chip color combo. (Note to self - get some of the Guava PDSP during the November paper special!)


Thanks so much to all of the birthday babes from the DDSS! It was fun to get so much "happy" mail during my birthday.

Monday, October 22, 2007

Featured Stamper Bold Birthday

Sunday's featured stamper on SCS was Carole Burrage aka TruCarMa. She has some great cards, so I had a little trouble choosing which one I wanted to CASE. I finally settled on this one.

Carole uses lots of bright colors in her cards, so this challenge was exactly that for me. It was fun to break out of my mold a little though and brighten things up a bit. I also made a long card, another thing I don't usually do, to mirror her sample.

My card base is a 9 x 8" piece of Purely Pomegranate cardstock folded in half. The focal image is a variety of gifts and cakes stamped with the Big Bold Birthday set. The cakes are the gift stamp just stamped upside down. The small flower on the Certainly Celery cake is adhered with a Target $1 spot brad. After stamping the images, I stamped Happy Birthday repeatedly at the bottom in Basic Black. I then layered this piece on Basic Black and Bashful Blue and added some American Crafts ribbon. I've had this ribbon for quite awhile, and I can't ever remember using it. I pulled all the colors for the card from the ribbon.

This was a fun challenge - Carole was a great choice for the featured stamper! Be sure to check out her gallery if you get a chance.

Recipe:
Stamps: Big Bold Birthday
Cardstock: Purely Pomegranate, Basic Black, Bashful Blue, Whisper White
Ink: Purely Pomegranate, Basic Black, Bashful Blue, Certainly Celery
Other: Target $1 Spot Brad, American Crafts Ribbon

Sunday, October 21, 2007

Weekend Sketch Challenge

I decided to use Stem Silhouettes again for Beate's weekend sketch challenge. This sketch was such a versatile one - I know I'll use it again.

The card base is a 4 1/4 x 11" piece of Chocolate Chip cardstock. On the base, I layered a 4 x 5 1/4" piece of River Rock. I stamped the Script background in Versamark on the River Rock piece. I really like this background, but I forget that I have it. It was retired long before I was familiar with SU!, but I saw it on SCS and knew that I'd like it. The Irish Blessing was part of our wedding ceremony, so I wanted to use it in our wedding album. I just need to break it out more often. I also stamped part of the swirl from Baroque Motifs in River Rock in the lower left corner, distressed the edges of the piece and added Vintage brads to the upper right.

For the focal piece, I stamped the stem in Old Olive and 2nd and 3rd generation Old Olive on Very Vanilla cardstock. I then added a shadow in River Rock. The sentiment is from So Many Sayings. I used my Chocolate Chip marker to ink just the word grateful (from ever grateful). I distressed the edges and matted it on Chocolate Chip.

The middle strip is a piece of Old Olive cardstock stamped with Linen in Old Olive. I distressed the edges of it and matted it on Chocolate Chip as well. Finally, I added a piece of Chocolate Chip Taffeta Ribbon to finish it off.

Recipe:
Stamps: Stem Silhouettes, Script, Baroque Motifs, So Many Sayings
Cardstock: Chocolate Chip, River Rock, Old Olive, Very Vanilla
Ink: Old Olive, Chocolate Chip, River Rock, Versamark
Other: Chocolate Chip Taffeta Ribbon, Vintage Brads

Tuesday, October 16, 2007

Go Pink!

Today's color challenge was Pink in honor of National Breast Cancer Awareness Month. I decided to pair Pretty in Pink with Purely Pomegranate. I also decided to use Baroque Motifs AGAIN - for my third color challenge card in a row! See the other 2 here and here.

I've had this idea in my head since I saw the calendar in the November Stampin' Success magazine (the monthly magazine for SU! demonstrators), but I hadn't had a chance to try it out yet. The calendar on page 4 of the magazine shows squares in different colors of orange with the Baroque Motifs swirl in the background. To create the swirls on the different colors, I cut out a 3" square of Pretty in Pink, Purely Pomegranate and Whisper White. I then used my stamp-a-ma-jig to stamp the swirl in as close to the same spot on each square as possible. All were stamped in Purely Pomegranate ink. After stamping the swirl and a few flowers, I cut each square into nine 1" squares and then pieced my focal image together using some of each of the 3 colors. The 9 squares were matted on a 3 1/4" square of Basic Black and then a 3 1/2" square of Purely Pomegranate. I added the hardware and Purely Pomegranate DS ribbon and then adhered it to a 4 1/4" square card base of Pretty in Pink. The sentiment from So Many Sayings was added directly to the card base in Basic Black.

With the remaining squares, I can create 2 additional cards.

Thankfully, I don't know of anyone right now struggling with Breast Cancer. If you do and could use this card to brighten someone's day, I would love to send it to you. Just leave me a quick comment and let me know!

Recipe:
Stamps: Baroque Motifs, So Many Sayings
Cardstock: Pretty in Pink, Purely Pomegranate, Whisper White, Basic Black
Ink: Purely Pomegranate, Basic Black
Other: Purely Pomegranate DS Ribbon, Hardware (unknown maker)

Birthday Slider

Monday's technique challenge was to create a treat slider. If you aren't familiar with these, they can hold bags of microwave popcorn, candy bars, or some other type of flat candy. Well - I thought they were really cute, but I couldn't think of anything I could use it for soon, so I decided to make mine a card. My niece's 5th birthday is next week, so I needed to start working on a card for her anyway. And I thought she might enjoy an interactive card like this.

I used the dimensions from Nichole Heady's blog Capture the Moment for my card. The outside of the slider is a 4 1/4 x 9" piece of Rose Red cardstock scored at 4 1/4 and 8 1/2. I used sticky strip to adhere the 1/2" flap to the other side of the slider. For my front layout, I used Jen del Muro's weekend sketch. I don't remember the exact dimensions of all the pieces because I played around with them a little bit until I was happy with the layout. The striped DSP is from the Cutie Pie package. It is matted on Basic Black cardstock. The bottom DSP is from the Rose Red Prints package. I loved that paper in the 6x6 pack, so I had to buy a whole package. The focal image is the cupcake from Big Bold Birthday. The cupcake bottom is stamped in Certainly Celery, and the top is stamped in 2nd generation Rose Red with Rose Red polka dots. The small flower was stamped in Rose Red, cut out, and adhered with a black brad. I added doodling around the cupcake and then matted it on Certainly Celery cardstock.

The one thing I changed from the layout is the bottom strip. I moved mine to the middle of the card since I thought it would look more balanced to have the ribbon in the pull out be an extension of this strip. For the strip, I stamped the Happy Birthday stamp multiple times in Basic Black and then matted it on a small strip of Basic Black cardstock.

After the front layout was adhered to the card, I set black eyelets on the center right edge to thread the ribbon through for the inside message. I used sentiments from It's Your Birthday for the inside and just made sure to stamp them above and below where the ribbon would be. I added doodling around the inside card as well.

Recipe:
Stamps: Big Bold Birthday, It's Your Birthday
Cardstock: Rose Red, Basic Black, Whisper White, Certainly Celery, Cutie Pie DSP, Rose Red Prints DSP
Ink: Rose Red, Certainly Celery, Basic Black Marker
Other: Vintage Brad, Black Ribbon, Black Eyelets
Technique: Treat Slider

Monday, October 15, 2007

Basic Silhouettes

I apologize for the dark picture. It has been rainy and gloomy here for the past 2 days and the forecast is the same for the rest of the week. If the sun comes out a little bit, I'll try to get a better picture. Anyway - I just got Stem Silhouettes late last week so I wanted to try it out. I didn't have a lot of stamping time, so I decided to keep it fairly simple and used Beate's weekend sketch challenge for my layout.

I used a 4 1/4" square of Basic Grey for my card base. My focal image is a 2 3/4" square of Whisper White. I used the Reverse Masking technique to create a square of Basic Grey in the center and then stamped the stems twice in Basic Grey. I then stamped the stem again with Basic Grey on the stems and Purely Pomegranate on the buds. Since we don't have a Purely Pomegranate marker, I just used a blender pen to pick up ink from the pad to color directly on the stamp. I then used my Versamark pen on the buds and heat embossed them with clear embossing powder to make them stand out a little more. This piece was then layered on a 2 7/8" square of Basic Black and a 3 1/8" square of Purely Pomegranate. After layering, I added the Basic Grey Taffeta Ribbon and the 2 brads. The brads are from Target's $1 spot and coordinate very well with Purely Pomegranate. Some of the other brads in the package coordinate nicely with Certainly Celery and Bashful Blue. Unfortunately, there are only 2 of each in a package. I did buy 2 packages when I picked these up a few weeks ago, but maybe I'll have to see if Target has any left and pick up a few more.

After adding the focal image to my card base, I stamped the sentiment "Blessings brighten when we count them" to the bottom of the card in Basic Grey and added a line of paper piercing right above the sentiment.

I didn't really give this set a second look when I first saw the Holiday mini, and even after it went on sale last month I was still planning to pass on it. I'm so glad I didn't though. I've seen such beautiful samples on SCS (of course), and I think it will be such a versatile set. I'm looking forward to playing with it more in the next week or so. And, I really love this color combo. I just got Basic Grey, and I think it goes so well with Purely Pomegranate.

Thanks for looking! Have a wonderful day!

Recipe:
Stamps: Stem Silhouettes
Cardstock: Basic Grey, Whisper White, Basic Black, Purely Pomegranate
Ink: Basic Grey, Purely Pomegranate, Versamark
Other: Basic Grey Taffeta Ribbon, Brads (Target $1 Spot), Clear Embossing Powder

Technique: Reverse Masking

Saturday, October 13, 2007

My Sweet Hubby!

I don't have a card to share today, so I thought I'd share a little something from my sweet hubby. Sunday is my birthday, so he surprised me on Thursday with this beautiful bouquet of flowers. I had already gotten one of my gifts, so I certainly wasn't expecting it. Such a nice surprise though! And they are beautiful!

The other gift he had already given me was the color caddy in the picture. Of course it couldn't be a surprise since I had to order it, but that certainly didn't matter to me. I don't have all of the SU! ink pads yet, but I've acquired several since becoming a demo and my temporary storage was not working well. Now if I can just put them back in the caddy when I'm done using them and not leave them all over my stamping table!

Last year, before I was a demo, DH surprised me with SU!'s tabletop cutter on my birthday. He definitely knows one sure way to his wife's heart - stamping supplies!! I was in a stamp club with a few of his fellow teachers, so he talked to one of them and got our demo's contact information. He ordered the cutter and had it delivered to this friend's house so I wouldn't see it. She even wrapped it for him! Needless to say, I was very surprised. It would have been a long time before I ordered the cutter since I always found new stamps and paper I needed for my club orders. But he is very observant and saw that my old cutter just wasn't "cutting it" anymore. Anyway - I love it and know I'll love this year's color caddy just as much.

I've included a few pics of DH also. The first is one of my favorites. It's not the best quality picture, but I love his smile in that one. It was taken the night before our wedding a little over 2 years ago. The second was taken on a motorcycle trip we took one day last summer. He couldn't be more supportive of me and I love him for that!

Wednesday, October 10, 2007

Miracle Baby!

A friend of mine recently had her little girl at 31 weeks, so I used this week's sketch challenge to make a card for her. I knew I wanted to use the sentiment from That's Nice (since she really is a miracle baby), and I thought it fit well with this sketch. She was born at 3 lbs 14 oz, and after spending just a week at a children's hospital, she's back at our local hospital and doing incredibly well. She hasn't had to be on oxygen at all and is gaining weight every day.

For the card base, I used an 8 1/2 x 5 1/2" piece of Whisper White cardstock folded in half. After folding, I cut an inch off the front. (I could have also just cut the cardstock an inch smaller and then scored at 3 1/4".) The main background is a piece of 3 x 5 1/4" Pretty in Pink cardstock. I stamped it with the small flower from Papertrey's Green Thumb set in Pretty in Pink and the polka dot in Whisper White. I added 2 black eyelets at the bottom and then matted it on a 3 1/8 x 5 3/8" piece of Basic Black. I also added a strip of Pretty in Pink down the side of the left opening that I scalloped with my corner rounder. The right side panel is a piece of 1 1/4 x 5 1/4" Certainly Celery Prints DSP matted on a 1 3/8 x 5 3/8" piece of Basic Black.

The focal image is a 3 x 2 1/2" piece of Whisper White. I inked just the word BABY with Pretty in Pink and stamped it down the side. I then stamped the remainder of the sentiment in Pretty in Pink, carefully removed the ink from the word MIRACLE and markered it with Certainly Celery. After stamping the sentiment, I added the sweet pea image from Green Thumb in Certainly Celery and the inside "peas" in Pretty in Pink and free hand doodling around the edges. This was then layered on a 3 1/8 x 2 5/8" piece of Basic Black and a 3 5/8 x 2 3/4" piece of Certainly Celery. I added 3 eyelets down the side with my new Crop-a-dile and threaded each with a piece of ribbon.

Recipe:
Stamps: That's Nice, Green Thumb
Cardstock: Whisper White, Pretty in Pink, Basic Black, Certainly Celery, Certainly Celery Prints DSP
Ink: Pretty in Pink, Whisper White, Certainly Celery
Other: Black Gingham Ribbon, Black Eyelets
Tools: Crop-a-dile, Corner Rounder

Tuesday, October 9, 2007

Baroque Sympathy

When I saw the color challenge for today to use River Rock, Basic Gray and Basic Black, I immediately thought of a sympathy card. I always have such a hard time with sympathy cards, so I decided it might be good to have one on hand. I broke out my Baroque Motifs set again and used a layout similar to one I've used before with that set. You can see that card here.

For this card, I started with a 4 1/4 x 8 1/2" piece of River Rock folded in half. I stamped the swirl from Baroque Motifs in the lower left and upper right corners of the card base. The swirl was first inked in Versamark and then in Basic Gray so I could emboss it with clear embossing powder. I thought the Basic Gray looked a little "flat" on the River Rock by itself, so I decided to emboss it to give it some dimension. I then stamped the swirl again in River Rock as a shadow.

The inside piece of River Rock measures 3 x 4 1/4" and was stamped the same way as the card base. This piece was then layered on a 3 1/8 x 4 3/8" piece of Basic Gray and a 3 3/8 x 4 5/8" piece of Basic Black.

The center strip of River Rock measures 1 x 4 1/4" and is layered on a 1 1/8 x 4 1/4" piece of Basic Black. With Sympathy was stamped in Basic Gray. (It is from one of last year's hostess sets, but I can't remember the name off the top of my head.) The medallion was also stamped in Versamark and Basic Gray and embossed with clear embossing powder, and the small flower was stamped in Versamark and River Rock and embossed as well. A black brad is attached in the center of the flower.

I hope I don't have to use this card anytime soon, but I guess I'll have it now in case I need it.

Thanks for looking! Have a great day!

Recipe:
Stamps: Baroque Motifs, Hostess Set
Cardstock: River Rock, Basic Gray, Basic Black
Ink: Basic Gray, River Rock
Other: Vintage Brad, Clear Embossing Powder

Saturday, October 6, 2007

Happy World Card-Making Day!

I wasn't going to stamp today. I REALLY wasn't because I have some housework that needs to get done. BUT, how could I resist on World Card-Making Day? I don't think it was truly an option! Anyway, I saw the Inspiration Challenge on SCS today and thought I'd give it a shot. I've never done this particular challenge before.

The challenge was to use this bedding from Pottery Barn as your inspiration. So, here is what I came up with.

I started with a 3 3/4 x 4 1/4" piece of Whisper White. I stamped one of the flowers from Big Blooms in Pumpkin Pie and then rock-and-rolled it in Purely Pomegranate. I added some additional flowers (from Papertrey's Green Thumb) in Bashful Blue, Pretty in Pink and Pumpkin Pie, with centers of Basic Gray. I then added a couple of leaves in Old Olive. The leaves are from a CTMH set that I've had forever, but I don't remember the name. I then sponged the edges of the piece in Bashful Blue.

After stamping the focal image, I cut it into 3/4" strips. I decided to do this as a panel card to imitate the quilting on the bedding. (And I just really like that layout!) I added my panels to a 4 x 4 3/8" piece of Basic Gray and then added a piece of Basic Gray Taffeta Ribbon. I just got that ribbon yesterday, so I had to use it. It is beautiful!

The bottom piece is a 4 1/8 x 2 1/2" piece of Bashful Blue cardstock. I stamped "from the heart" onto it in Basic Gray before adhering to the card.

I hope you like it! Now - back to housework. I need to get some done so we can watch football tonight. I'm not usually a big football fan, but Missouri is playing Nebraska. I am a Missouri alum now living in the heart of Cornhusker country. Football is a big deal here, so we'll see how the game goes. Regardless, I am rooting for my Missouri Tigers!

Recipe:
Stamps: Big Blooms, Green Thumb, CTMH set
Cardstock: Whisper White, Bashful Blue, Basic Gray
Ink: Pumpkin Pie, Purely Pomegrante, Bashful Blue, Pretty in Pink, Basic Gray, Old Olive
Other: Basic Gray Taffeta Ribbon

ETA: Missouri 41 Nebraska 6

Friday, October 5, 2007

Falling for Quilts

I saw a thread on SCS last week about quilt cards, and I knew I had to make some. Both my mom and mother-in-law are quilters, so I wanted to make some for each of them. And with the beginning of fall and cooler weather, they are definitely appropriate for this time of the year. It was fun to put the patterns together, and I'm really happy with the result of these.

The first one uses my neglected Au Chocolat DSP. My card base is a 5 1/2 x 8 1/2" piece of Very Vanilla folded in half. To create the quilt, I cut eight 1 1/4" squares from the various patterns of Au Chocolat and then cut each in half diagonally. The quilt is created on a 5 x 2 1/2" piece of Very Vanilla. Before I started adding the triangles, I covered the entire rectangular base with double-sided tape to make adhering the pieces a little easier. I then placed the triangles in an alternating pattern (i.e. one up, one down, etc.)to fill in the rectangle. I layered this piece on a 5 1/8 x 2 5/8" piece of Very Vanilla and then a 5 1/4 x 2 3/4" piece of Chocolate Chip. I added my twill tape, adhered it to my card base and then added the sentiment from Happy Harmony at the bottom.

Recipe:
Stamps: Happy Harmony
Cardstock: Very Vanilla, Chocolate Chip, Au Chocolat DSP
Ink: Chocolate Chip
Other: Twill Tape


My second quilt uses the Cutie Pie DSP in a log cabin style. I followed the basic directions in Nancy Riley's tutorial and just modified my dimensions a little bit for this particular card. I started with a 4" square piece for my quilt base. The center of the quilt is a 3/4" square, and then the strips are 1/4" wide. I used 9 strips to fill in each side. The finished quilt was then layered on a 4 1/8 by 5" piece of Rose Red. I finished off the card with white grosgrain and the "from me to you" sentiment from So Many Sayings. I think the Cutie Pie paper made such a fun pattern for this one.

Recipe:
Stamps: So Many Sayings
Cardstock: Rose Red, Whisper White, Cutie Pie DSP
Ink: Rose Red
Other: White Grosgrain

The third card also uses the log cabin style. This was actually the first quilt card I made, so I followed Nancy's dimensions with one exception - I started with a 4" square for my quilt base. This one uses the Apple Cider DSP and Warm Wishes from Hugs & Wishes (I thought very appropriate for a quilt card). I also stamped the medallion from True Friend in the center.

Recipe:
Stamps: Hugs & Wishes, True Friend
Cardstock: Really Rust, Chocolate Chip, River Rock, Apple Cider DSP
Ink: Chocolate Chip
Other: Twill Tape

The first two of these cards meet the Limited Supplies Challenge for today - to use just patterened paper and a sentiment (any other cardstock and embellishments ok). I met a challenge and didn't even know it! Now I just need to find some time to finish the gift sets for the mothers.

Have a great weekend!

Thursday, October 4, 2007

Sweet Little One

I needed a baby card for a friend who recently had a little girl, so I decided to use this week's sketch challenge for it. I don't have any traditional baby stamps, so I pulled out my Papertrey Little Lady set that I haven't used in awhile. I tend to like wood mounted sets better, but I do like the quality and versitility of the two Papertrey sets I have.

I started with a 5 1/2 x 8 1/2" piece of Pretty in Pink cardstock folded in half for my card base. To that, I layered a 5 1/4 x 4" piece of Whisper White that was stamped with the small flower in Pretty in Pink and Purely Pomegranate and the Polka Dot in Basic Black. The middle strip of Pretty in Pink was scalloped using the SU! corner rounder. I added Black Gingham ribbon and Vintage brads to that piece as well.

For the focal image, I stamped the lady bug body in Pretty in Pink and her spots in Basic Black. I stamped her body a second time, cut it out and covered it with Crystal Effects. The trail was stamped in Basic Black. This piece was then layered on Basic Black and Purely Pomegranate.

The "sweet little one" sentiment is from Holidays & Wishes.

I'm really pleased with how this turned out. It's always nice when the image in your head actually turns out the same on paper. This was a really fun sketch, and I'm sure I'll be using it again!

Recipe:
Stamps: Papertrey Little Lady, Holidays & Wishes
Cardstock: Pretty in Pink, Whisper White, Basic Black, Purely Pomegranate
Ink: Pretty in Pink, Purely Pomegranate, Basic Black
Other: Black Gingham Ribbon, Vintage Brads
Tools: Corner Rounder, Crystal Effects

Wednesday, October 3, 2007

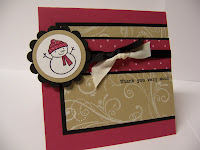
Merry & Bright Thank Yous

I just got Merry & Bright yesterday, so of course I had to play! Those little images are just so cute! I went back and forth several times on whether to get this set, but I've seen so many cute samples that I finally caved. It's not like it's an expensive set, so I don't know why I waited so long. Anyway, I know I'll enjoy playing with it more in the next few days.

I didn't have anything specific in mind when I started on these, so as I was working on the first one I decided to do some holiday thank you cards. I know I'll need some in a few months.

I think these images lend themselves well to 4 1/4" square cards, so that is what all of these are. The stamping on them is pretty straightforward, so I won't go into a lot of detail on that. I'm not sure if you can really see it in the pictures or not, but I did do some paper piecing on the snowman's hat and scarf. I know it's small so it might not make a huge difference, but I think the pattern adds to it IRL. Individual pictures and basic recipes are included below.

Recipe:
Stamps: Merry & Bright, Much Appreciated
Cardstock: Blue Bayou, Chocolate Chip, River Rock, Whisper White (this week's color challenge colors)
Ink: Chocolate Chip, Whisper White
Other: Blue Bayou Double-Stitched Ribbon, Real Red Brad, Pastels
Tools: Corner Rounder, Scallop Punch, Circle Punch


Recipe:
Stamps: Merry & Bright, Much Appreciated
Cardstock: Rose Red, Basic Black, River Rock, Whisper White, Rose Red Prints DSP
Ink: Basic Black, Whisper White
Other: Basic Black Grosgrain, Twill
Tools: Scallop Punch, Circle Punches


Recipe:
Stamps: Merry & Bright, Priceless
Cardstock: Certainly Celery, Certainly Celery Prints DSP, Real Red, Whisper White
Ink: Certainly Celery, Real Red
Other: Real Red Grosgrain, Silver Elastic Cord, Vintage Brad
Tools: Spiral Punch, Scallop Punch, Circle Punch

Tuesday, October 2, 2007

Embossed Baroque

[NOTE: This image has been temporarily removed. This card will appear in the August 2008 issue of the CARDS idea book series. It will return here sometime after publication.]

I was having trouble sleeping last night, so I found the Tuesday color challenge for this week a little earlier than normal. I figured I might as well do something productive with my time, so I decided to give it a try. The colors for this week are Blue Bayou, Chocolate Chip and River Rock. I really like these colors together and did a card with them a few weeks ago.

For this card, I used a 4 1/4 x 11" piece of Blue Bayou folded in half for my card base. To that, I added a 4 1/8 x 1 1/2" piece of River Rock. The River Rock piece was stamped with a portion of the swirl from Baroque Motifs and the kindness definition from Define Your Life, both in River Rock. I also added vintage brads in the bottom 2 corners.

For the focal piece, I used a 3 3/4 x 3" piece of Very Vanilla and stamped the swirl in Chocolate Chip and then in River Rock and added flowers in Blue Bayou. I then covered the entire piece in Versamark and embossed it with clear embossing powder. While the powder was still hot, I added a couple of additional layers of embossing powder to give the piece a tile look (similar to my other card). After embossing, I cut the piece into three 1 1/4" panels and adhered them to a 4 x 3 1/8" piece of Chocolate Chip and added the Chocolate Chip Taffeta Ribbon (I love that stuff!).

After the card was assembled, I added the sentiment on the top right. I've been hoarding my cards lately, so I decided to make this one a thank you card so I could send it to a family that had my DH and I over for lunch on Sunday. I hope they like it. (And I hope I can stay awake at work today after stamping in the middle of the night!)

Have a great day!

Recipe:
Stamps: Baroque Motifs, Define Your Life
Cardstock: Blue Bayou, Chocolate Chip, River Rock, Very Vanilla
Ink: Blue Bayou, Chocolate Chip, River Rock
Other: Chocolate Chip Taffeta Ribbon, Vintage Brads
Techniques: Embossing

Monday, October 1, 2007

October Stampin' Up! Specials

Holiday Glitz Promotion
October 1-while supplies last

Make your holiday cards glitzy this year with a little help from the Holiday Glitz card kit. With Stampin' Up!'s precut card stock and Designer Series paper, festive zigzag ribbon, and Rhinestone brads, spreading handmade holiday cheer has never been this easy!

Each Holiday Glitz card kit makes 15 handmade cards and includes:

Precut card stock and Designer Series paper (15)
Whisper White Envelopes (15)
Rhinestone brads (15)
Real Red zigzag ribbon (15)
Full-color instruction sheet (1)

There are two ways to take advantage of this fantastic kit while supplies last:

Purchase one of the holiday stamp sets listed below and get the Holiday Glitz card kit for the special price of $24.95, or
Purchase the Holiday Glitz card kit for $28.95 with no additional purchase required.

Qualifying stamp sets include:
Snowfall - $23.95
The Snowflake Spot - $20.95
Big on Christmas - $18.95
Love & Joy - $23.95


Simply Sent Card Kits 20% Off!
October 4-8

In honor of World Card Making Day, Stampin' Up! is offering 20% off all Simply Sent card kits from October 4-8. Check out the available kits on pages 12-14 of the current Fall/Winter collection.

Don't miss out on these great specials! Contact me to place your order!