I've tried a couple of different versions of gift card holders, and I think this is one of my favorites. The finished card size is 5 x 4" and is a tri-fold. On the open view, you can see the slits punched for the gift card on the bottom and an area to write your message in the middle. The holder could also be done as a regular bi-fold card, but I like the variety of the tri-fold for this one.
The card base is a 5 x 12" piece of bashful blue scored at 4" and 8". For the front, I added a couple of different pieces of Summer Picnic DSP - the cherry print and the Old Olive stripe. I used the corner rounder to create the scallops on the striped paper. I then added a piece of Real Red cardstock on the lower portion, added faux stitching with the Signo white gel pen, and stamped For You in Whisper White in the lower right-hand corner. The red gingham wraps around the entire card to hold it closed.
The cherry was inked with Real Red and Old Olive markers and punched with the 1 1/4" circle punch. It is matted on an Old Olive 1 3/8" circle and then on a Real Red scallop. Finally, I added Crystal Effects to the cherries and adhered it on top of the gingham.
For the gift card section, I pushed the slit punch all the way in on both sides. I wanted it to be a fairly good fit so the card wouldn't slide out on it's own. The middle section is a piece of Whisper White cardstock, stamped with the cherry and sponged in Real Red on the edges.
Recipe:
Stamps: Tart & Tangy, Happy Everything
Cardstock: Bashful Blue, Real Red, Old Olive, Whisper White
DSP: Summer Picnic
Ink: Whisper White
Markers: Real Red, Old Olive, Signo White Gel Pen
Accessories: Red Gingham
Tools: 1 1/4, 1 3/8 and Scallop Circle Punches, Slit Punch, Corner Rounder
Monday, March 31, 2008
Friday, March 28, 2008
Ways to Use It Challenge
This card was created for this week's Ways to Use It challenge, Just Spray It - using Glimmer Mist, water misting, color spritzer, airbrush, hairspray...or whatever else you can think of on your card. I used the misting with markers technique recently highlighted on SCS.
I colored the flower from Heartfelt Thanks with Ruby Red and Old Olive, misted the stamp with water, and then stamped it on a piece of Very Vanilla. I did this a few times and used some of the stamps multiple times for a 2nd and 3rd generation look. I also stamped the Linen background on the Vanilla cardstock in second generation River Rock. I'm not sure I totally achieved the watercolored look I was aiming for, so I'll have to experiment again. I really like how the focal piece turned out though.
The finished card is a 4 1/4" square with a layout I've used before (but have never posted). The layout came from a card I saw on Papertrey's site, and I really love it for the square cards.
The congratulations from Hugs & Wishes was added to a 3/4" strip with the corners rounded on one end. This card is going to my husband's aunt who recently won a teaching award, so we wanted to send her a quick note with our congratulations.
Recipe:
Stamps: Heartfelt Thanks, Hugs & Wishes
Cardstock: River Rock, Chocolate Chip, Very Vanilla
DSP: Ginger Blossom
Ink: Ruby Red, Old Olive
Accessories: Vintage Brads, River Rock Double-Stitched Ribbon
Tools: Corner Rounder, Rectangle Punch
Technique: Misting with Markers
Thursday, March 27, 2008
Double Pocket Bag
I'm working on a challenge of sorts for my stamp club and wanted to have a few door prizes for the winners. This is the first - a double pocket bag. It's empty right now, but I'm sure I'll find something to put in it as well.
This is the first time I had tried one. I followed the tutorial from SCS, and it came together really quickly. I made just a few minor changes to mine though. After scoring the first side at 1" and 11", I folded the DSP so I would have an inch border at the top with the other side of the paper instead of folding it inside. I figured since we have double-sided paper, I might as well use it to the fullest extent! I also punched the holes for my ribbon before adhering the two sides of the bag to each other. I thought it would be easier to punch that way.
I chose to just add a chipboard tag to mine instead of adding other stamped images to the front. Since I don't know the recipient yet, I thought this would allow them to use it for a variety of occasions. The chipboard was a plain rectangle from the On Board Accents set. I covered it with Whisper White ink and then added a small strip of Bashful Blue cardstock and a piece of the Pumpkin Pie polka-dot pattern from Summer Picnic. The u, from Jumbo Outline Alpha, was stamped in Pumpkin Pie, and then the 4, from Short Order Numbers, was added in Bashful Blue. I punched a hole at the top with my Crop-a-dile and added a white eyelet. I threaded the ribbon through the eyelet before attaching it to the bag (the ribbon is threaded through each hole and then adhered to itself with sticky strip).
I really love how this turned out, and I'm sure I'll be making more (if you've visited my blog much, you know how much I like making bags and boxes of all kinds!). This would make such a cute presentation of a gift card - put a card in one pocket and a gift card or some other small treat in the other. I also think I'll have to order more of the Summer Picnic DSP before the end of May - I love that stuff!
Recipe:
Stamps: Jumbo Outline Alpha, Short Order Numbers
Cardtock: Bashful Blue
DSP: Summer Picnic
Ink: Whisper White, Pumpkin Pie, Bashful Blue
Accessories: On Board Accents Chipboard, White Eyelet, Pumpkin Pie Striped Ribbon
Tools: Crop-a-dile, Slot Punch
Wednesday, March 26, 2008
So Sweet of You
I've always liked this Zoofari card by Nancy Riley, and I thought the layout would be a fun one to use with Tart & Tangy.
The base is a 8 x 9" piece of Old Olive cardstock, with a finished card size of 4 x 9". The stamped fruit were punched with a 1 1/4" circle punch and layered on 2" squares of Summer Picnic, which was then matted on Chocolate Chip cardstock. The green stripe going down the right side is also from Summer Picnic and matted on Chocolate Chip. I added 2 Vintage brads at the top and my very last piece of Chocolate Chip Taffeta towards the bottom (good thing I have more on it's way!).
The stamped sentiment at the bottom reads, "so sweet of you", and is a combination of stamps from So Many Scallops and So Very (one of last year's Sell-A-Bration sets). I thought the "so sweet of you" saying on the So Many Scallops stamp was too small by itself, so I used my trusty stamp-a-ma-jig to stamp "so" by itself, the "sweet" stamp from the So Very set, and then "of you" (again from So Many Scallops). It was a little more work than if I would have had one of the coordinating Perfect Day Rub-Ons, but I like the end result.
Recipe:
Stamps: Tart & Tangy, So Many Scallops, So Very
Cardstock: Old Olive, Whisper White, Chocolate Chip
DSP: Summer Picnic
Ink: Chocolate Chip, Pumpkin Pie
Markers: Old Olive, Real Red, Chocolate Chip
Accessories: Vintage Brads, Chocolate Chip Taffeta
Tools: 1 1/4" Circle Punch
Tuesday, March 25, 2008
Felt Flowers
I've had the Felt Fusion flowers on my wish list since the new Stampin' Up! catalog came out, and I'm so glad I put them on my last order. They are so fun to play with! Hopefully there will be even more colors in the next catalog.
I played around with the layout of this card for quite awhile before I finally settled on this one. It was one of those cards I had to just step away from for awhile. Not that it was a really complicated card, but my original idea just wasn't coming together the way I wanted it to. I'm happy with the end result though.
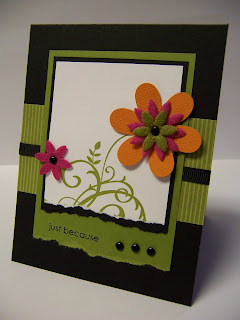
The card is a standard 4 1/4 x 5 1/2" with a base of Basic Black. The focal piece is a 2 3/4 x 3 1/8" piece of Whisper White layered on Basic Black and then on Old Olive. I stamped the swirl from Baroque Motifs in Old Olive and then added the Pumpkin Pie Die Cut Bloom and Rose Red and Old Olive Felt Flowers. The flowers are adhered with Black Vintage Brads. The bottom edge of each of the pieces was torn before they were adhered together, and I added the "just because" sentiment from the Love & Happiness rub-ons and some additional black brads.
The middle piece is a 4 1/4 x 2" strip of Summer Picnic DSP. I love that Old Olive striped pattern! A piece of Basic Black grosgrain was adhered in the middle of the DSP.
Overall, it's a fairly simple card, but I really love the bright colors of the flowers with the Basic Black.
Recipe:
Stamps: Baroque Motifs
Cardstock: Basic Black, Old Olive, Whisper White
DSP: Summer Picnic
Ink: Old Olive
Accessories: Pumpkin Pie Die Cut Bloom, Rose Red and Old Olive Felt Fusion Flowers, Black Vintage Brads, Basic Black Grosgrain, Love & Happiness Rub-Ons
Sunday, March 23, 2008
Reversible Baby Card
It’s been quite awhile since I’ve participated in the Featured Stamper challenge at SCS, so I thought I’d play along today. I had recently visited Amy’s blog, Pickled Paper Designs, so I had an idea of the card I wanted to CASE. I needed a baby card for my husband’s cousin, and I thought this layout would work well with the baby stamp from So Many Scallops. However, I was having trouble figuring out how to incorporate the fact that she had twins – a boy and a girl. So – I couldn’t just go with the traditional pink or blue and didn’t really want to do a neutral color.
And, that is how the reversible card came about. My husband actually suggested the idea. He thought it would be fun to have two fronts to the card. One side has pink for the girl and the other, blue for the boy. The opposite side was adhered upside down from the front that is facing you at the time, so when you turn it over, it looks like a normal card front. The inside is done the same way.
I used Pretty in Pink for the girl and Bashful Blue for the boy. Otherwise, the card fronts are the same. They each have a 4 x 5 ¼” mat adhered to the card base. The congratulations stamp from Hugs & Wishes was stamped at the bottom of that piece. To that, I layered a 3 ¼ x 4 ½” piece of colored cardstock matted on a 3 3/8 x 4 5/8” piece of Whisper White. That layer is stamped with Print Pattern and dots were added at the points of the diamonds with the white gel pen.
A 4 x 1” piece of colored cardstock was matted on a 4 x 1 1/8” piece of Whisper White and adhered to the middle of the card. On each end, I added a 1 3/8” circle that was folded in half. On one half, I added a white eyelet and threaded Whisper White Taffeta through. The baby scallop stamp was then added on top of the ribbon.
This picture isn't the greatest, but hopefully you can see both card fronts and how, when it is open this way, one is just upside down of the other.
This was a fun card to make! Hopefully, the new parents will enjoy it also.
Recipe:
Stamps: Print Pattern, So Many Scallops, Hugs & Wishes
Cardstock: Whisper White, Bashful Blue, Pretty in Pink
Ink: Bashful Blue, Pretty in Pink
Accessories: White Eyelets, Whisper White Taffeta Ribbon
Other: Signo White Gel Pen, 1 3/8” Circle Punch
Wednesday, March 19, 2008
Cause for Celebration!
I just wanted to share some good news. I was notified last night that a card I submitted to a magazine was picked up for publication! How exciting is that - my first time being published! My card is scheduled to appear in the August 2008 issue of the Cards Idea Book Series.
The card is one that I originally posted on my blog and on SCS, so I have temporarily removed the image. I'll be able to share it again at the beginning of September.
Thanks for letting me share my excitement!
The card is one that I originally posted on my blog and on SCS, so I have temporarily removed the image. I'll be able to share it again at the beginning of September.
Thanks for letting me share my excitement!
Tuesday, March 18, 2008
Clearly in Bloom
Here’s another first for me this week – a clear card. I’ve wanted to try one for awhile but just hadn’t fit it in yet. This card by Laura at scrapnextras served as my starting inspiration point. It was almost impossible to get a good picture of the card, so I hope you can see how it all goes together.
The finished card size is 4 ¼” square, so I started with a 8 ½” x 4 ¼” piece of acetate for the base. For the inside, I adhered a 3” square piece of Summer Picnic DSP (the Pumpkin Pie Polka-Dot) to a 3 ¼” x 6 ½” piece of Whisper White. The Whisper White is folded in half (at the top) so it opens to give you a place to write your message. I added a 3 ½” square piece of Real Red to the back of the card to cover the adhesive from the inside pieces. The final touch on the inside was the for you rub-on from the Love & Happiness Sale-A-Bration set.
On the front, I stamped the swirl from Baroque Motifs in White Stazon and added a strip of the green stripe from Summer Picnic. My green strip is 8 ½” long so it wraps around the front inside to cover the brad on the flower and any adhesive from the front– a little tip I learned from Nichole Heady’s blog, Capture the Moment. My flower is a combination of a Real Red Die Cut Bloom and Old Olive and Pumpkin Pie felt flowers. They are adhered to the DSP with a Real Red brad.
Recipe:
Stamps: Baroque Motifs
Cardstock: Whisper White, Real Red
DSP: Summer Picnic
Ink: White Stazon
Accessories: Die Cut Bloom, Felt Fusion Flowers, Real Red Brad, Love & Happiness Rub-Ons
Other: Acetate
Sunday, March 16, 2008
Chalkboard Apples
I've wanted to try the chalkboard technique for awhile now, and I thought the apples from Tart & Tangy would be a fun stamp to use. I guess I fell into that old tradition of associating apples with school! Anyway, I liked the combination of black with the Real Red and Old Olive from the Summer Picnic DSP, so I thought it all worked well together.
This technique is different from anything I've tried before. I haven't really used my Pastels since I got them in my demo starter kit. I wasn't sure how I felt about not having totally smooth and even coverage on my stamped images, but I do like the way the card turned out. With the addition of the thank you stamp, I think it might be a fun one to give a teacher at the end of the year.
ETA: The card is a 4 1/4" square. The Basic Black and Summer Picnic DSP are 4" wide and about 2" tall (the middle green strip is 3/4"), and everything is matted on a 4 1/8" square of Whisper White.
Recipe:
Stamps: Tart & Tangy, Stem Silhouettes (thank you)
CS: Basic Black, Whisper White
DSP: Summer Picnic
Ink: Whisper White, Real Red
Accessories: Black Gingham, Old Olive Poly-Twill, Basic Black Grosgrain
Other: Pastels
Friday, March 14, 2008
Windows of Cherries
I’ve had this idea in my head for awhile, so I had to try it out as soon I got my Tart & Tangy set and the new Summer Picnic DSP. I don’t normally frequent the card section in stores, but I happened to be in Target one day and saw a card that inspired this one. The Target card had cherries all over the front, and the cherries were cut-out circles. It was monochromatic with a lighter color in the background for the cherry.
For my card, I cut 3 1 ¾” squares from Whisper White cardstock and stamped the cherry in Old Olive (I just stamped the whole thing in Olive since I wouldn’t be using the cherry part of the stamp). I then punched the cherries out with a ½” circle punch. The punch is slightly larger than the cherry, but the handheld punch is too small and the ½” circle accomplished my goal. Finally, the squares were adhered to a piece of Real Red cardstock with dimensionals to make the “window”.
To finish the card, I added a couple of different patterns from the Summer Picnic DSP and stamped Warm Wishes in Old Olive. The Old Olive poly-twill ribbon was tied through one of the punched out cherries.
Recipe:
Stamps: Tart & Tangy, Hugs & Wishes
CS: Old Olive, Real Red, Whisper White
DSP: Summer Picnic
Ink: Old Olive
Accessories: Old Olive Poly-Twill Ribbon
Tools: ½: Circle Punch, Signo White Gel Pen
Tuesday, March 11, 2008
Love Birds
It’s been awhile since I’ve posted anything, let alone done a color challenge. So – tonight I decided to do both. My favorite In-Color this year is Purely Pomegranate, so I was excited to see it as one of the colors for this week’s challenge – Purely Pomegranate, Basic Black and Basic Grey.
I just got the new Anniversary Birds set from Verve Visual, so I knew I wanted to incorporate it into my card. I don’t normally make impulse buys when it comes to stamp sets – I like to weigh my options and make sure I’ll really use the set before I get it. But, I have to say that I ordered this set the first day I saw it. I love these little birds!
I used Basic Grey as my card base and layered a panel of Purely Pomegranate on the left hand side. I stamped the swirl from Baroque Motifs on the Pomegranate and one of the sentiments from the new set on Basic Grey. Both were stamped in Versamark and then embossed with clear embossing powder. The birds were stamped in Pomegranate on Whisper White, and everything was matted on a layer of Basic Black.
The only other detail I added was a line of paper piercing along the top edge of the sentiment. I considered adding some Basic Grey Taffeta, but I just couldn’t make it work. I’m happy with the end result though and plan to send this to my niece and her husband who will celebrate their first anniversary in May.
Recipe:
Stamps: Baroque Motifs, Anniversary Birds (Verve Visual)
CS: Basic Grey, Basic Black, Purely Pomegranate, Whisper White
Ink: Purely Pomegranate, Versamark
Other: Clear Embossing Powder
Subscribe to:
Posts (Atom)